Upholster Your Own Headboard
April 13, 2010
How to Upholster a Headboard
Try it yourself with our how-to instructions below. 
What You Need
- Kraft paper and pencil
- Two 3/4-inch-thick medium-density fiberboard (MDF) or plywood panels
- Circular saw and jigsaw
- Sandpaper
- Screws
- 1-inch-thick soft-grade foam
- Marking pen
- Spray adhesive
- Muslin
- Measuring tape
- T-pins
- Upholstery Fabric (we used approximately 7 yards)
- Matching sewing thread
- Welting (purchased or made -- instructions below)
- Staple gun and staples, 5/8-inch
- Felt
Note
These instructions include making a muslin pattern to ensure proper fit before cutting the upholstery fabric. Sew with right sides facing and 1/2-inch seam allowances unless noted.
How to Make It
Step 1:
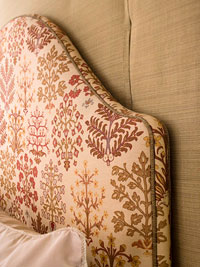
Decide on the size of your headboard; our headboard is wider than the mattress. Referring to the photograph, draw the headboard shape onto kraft paper and cut out. Trace around the paper template on each MDF or plywood panel with a pencil.
Step 2:
Cut on the traced lines, using a circular saw for straight cuts and a jigsaw for curves. Sand the edges to remove splinters. Screw the shapes together.
Step 3:
Place the template on the 1-inch-thick foam. Use a pencil or marking pen to draw a line about 2 inches beyond the edges of the template. Cut out the foam shape and attach it to the headboard base with spray adhesive. Roll the excess foam over the edges and secure to the sides of the base with the adhesive. Trim the foam even with the back of the base.
Step 4:
Draw two template shapes on the muslin. Cut out 1 inch beyond the side and top edges to allow for seam allowances and ease. Cut out 3 inches beyond all the other drawn lines to allow for overlap along the bottom and inner legs. Cut enough 3-1/2-inch-wide boxing strips from muslin to reach from one lower edge of the headboard to the opposite lower edge along the top line, plus 6 inches.
Step 5:
Sew the short ends of the strips together to make a long strip; press the seam allowances open. Use T-pins to secure a muslin piece on the headboard front. Pin the boxing strip to the front muslin shape and then to the back one. Check the fit of the muslin cover on the foam-covered base, adjusting as necessary.
Step 6:
When you are pleased with the fit, carefully remove the muslin cover. Use a pencil to mark the side and top cutting lines 1/2 inch outside the pinned lines to allow for seams on the front, back, and boxing strip. Cut along marked lines as you remove pins.
Step 7:
Use the muslin pieces as patterns to cut a front and back from upholstery fabric, watching for straight of grain and for the placement of large motifs. Depending on the size of the headboard, it may be necessary to seam the fabric to achieve the needed width.
Step 8:
Use the width and length of the muslin boxing strip to cut boxing strips from the upholstery fabric. Sew the short ends of the strips together to make one long strip. Press the seam allowances open.
Step 9:
Sew welting (see instructions below) around the side and top edges of the front and back upholstery shapes. Pin the boxing strip to the front upholstery shape, sandwiching the welting between the fabric layers; sew the boxing strip to the front. Sew the opposite long edge of the boxing strip to the back upholstery shape in the same manner. Clip the corners and curved seams.
Step 10:
Turn the cover right side out. Slip the fabric cover over the foam-covered base. Beginning at the center bottom edge of the main headboard section and working outward toward the legs, pull the excess fabric from the back toward the front and staple in place on the underside of the base, positioning the staples close to the front of the headboard.
Step 11:
Trim the fabric that reaches beyond the staples. Pull the excess fabric from the front toward the back. Neatly fold under the raw edge of the fabric from the front and staple in place, covering the previous staples. Continue with the inner legs, trimming the fabric as needed and clipping carefully at the corners. Wrap excess fabric around the bottoms of legs and trim. Cut felt for the bottom of each leg; glue in place.
How to Make Welting
Step 1: Cut 2-inch-wide strips of fabric on the bias.
Step 2: Sew them into lengths.
Step 3: Wrap them around cotton cording.
Step 4: Machine-sew the seam using a zipper foot.
Posted by Alicia Hughes.

 I am a southern girl who likes to have fun and break out of the box. I have Bachelors in Fine Arts from Southern Institute of Interior Design at Virginia College in Birmingham. I have learned the fundamentals of design and I love to have fun working and using my skills to better my community and creating beautifull spaces.